
路由处理程序
前后端分离架构中,客户端与服务端之间通过 API 接口来交互。这个“API 接口”在 Next.js 中有个更为正式的称呼,就是路由处理程序。
1.定义路由处理程序
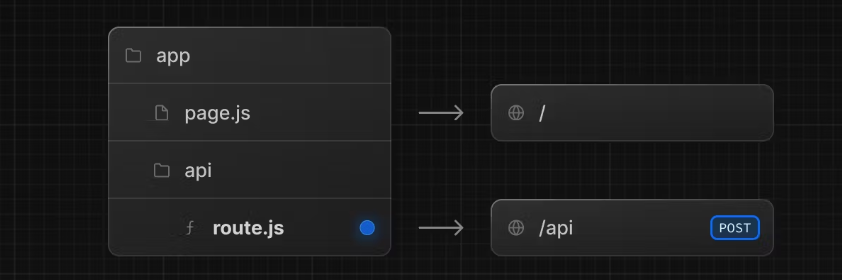
该文件必须在app目录下,可以在app嵌套的文件夹下,但是page.tsx和route.ts不能在同一层级。
1.1 GET请求
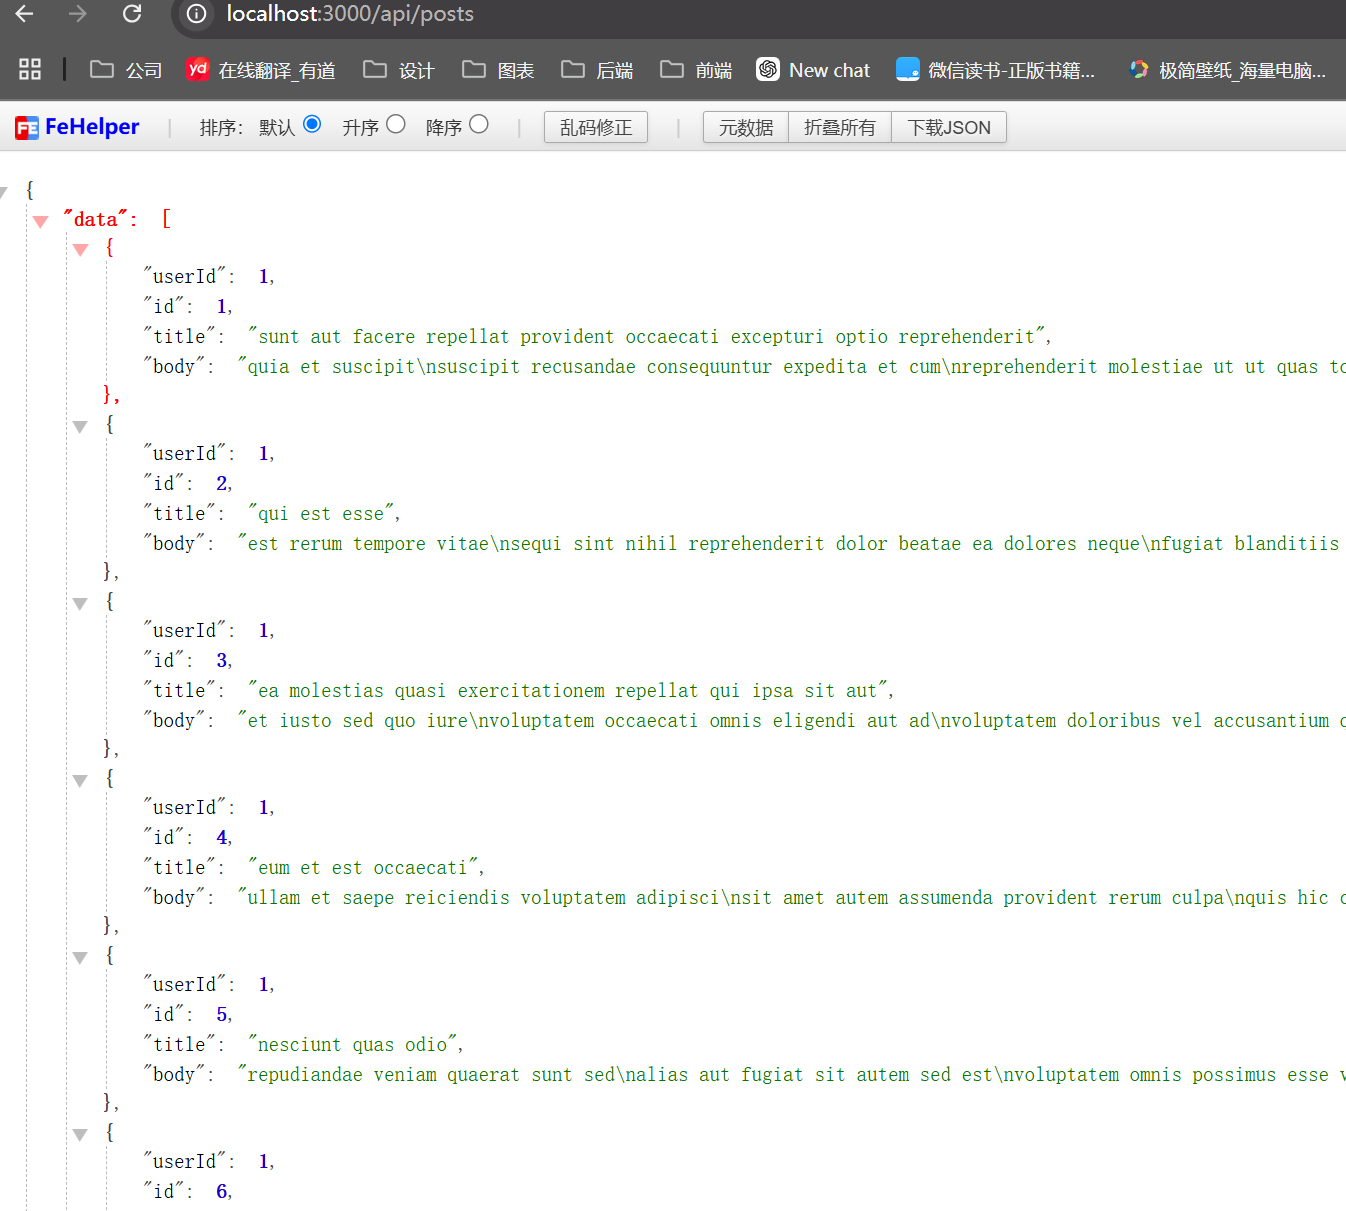
//app/api/posts/route.ts
import { NextResponse } from "next/server"

export async function GET() {
    const res = await fetch('https://jsonplaceholder.typicode.com/posts')
    const data = await res.json()

    return NextResponse.json({ data })
}
浏览器访问 http://localhost:3000/api/posts
1.2 支持方法
Next.js 支持 GET、POST、PUT、PATCH、DELETE、HEAD 和 OPTIONS 这些 HTTP 请求方法。如果传入了不支持的请求方法,Next.js 会返回 405 Method Not Allowed。
// route.js
export async function GET(request) {}

export async function HEAD(request) {}

export async function POST(request) {}

export async function PUT(request) {}

export async function DELETE(request) {}

export async function PATCH(request) {}

// 如果 `OPTIONS` 没有定义, Next.js 会自动实现 `OPTIONS`
export async function OPTIONS(request) {}
1.3 POST方法
export async function POST(request) {
  const article = await request.json()

  return NextResponse.json({
    id: Math.random().toString(36).slice(-8),
    data: article
  }, { status: 201 })
}
1.4 传入参数
每个请求方法的处理函数会被传入两个参数,一个 request,一个 context 。两个参数都是可选的:
export async function GET(request, context) {}request
request对象是一个NextRequest对象,它是基于Web Request API的扩展。使用 request ,可以快捷读取 cookies 和处理 URL。
获取URL参数:
export async function GET(request, context) {
  //  访问 /home, pathname 的值为 /home
	const pathname = request.nextUrl.pathname
	// 访问 /home?name=lee, searchParams 的值为 { 'name': 'lee' }
	const searchParams = request.nextUrl.searchParams
}
nextUrl 是基于 Web URL API 的扩展(如果你想获取其他值,参考 URL API)
context
目前context只有一个值params,包含当前动态路由参数的对象。
export async function GET(request, { params }) {
  const team = params.team
}
当访问 /dashboard/1 时,params 的值为 { team: '1' }。其他情况还有:
| Example | URL | params |
|---|---|---|
app/dashboard/[team]/route.js | /dashboard/1 | { team: '1' } |
app/shop/[tag]/[item]/route.js | /shop/1/2 | { tag: '1', item: '2' } |
app/blog/[...slug]/route.js | /blog/1/2 | { slug: ['1', '2'] } |
注意第二行:此时 params 返回了当前链接所有的动态路由参数。
1.5 缓存
默认缓存:默认情况下,使用Response(NextResponse)对象的GET请求会被缓存。
举例:
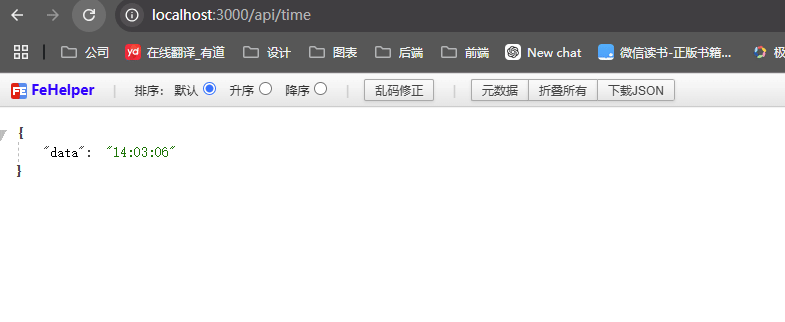
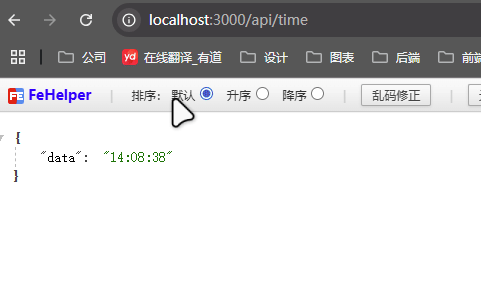
//app/api/time/route.ts
export async function GET() {
  console.log('GET /api/time')
  return Response.json({ data: new Date().toLocaleTimeString() })
}
开发模式下,并不会被缓存,每次刷新会改变
部署生产版本并运行,npm run build && npm run start
实现方式:
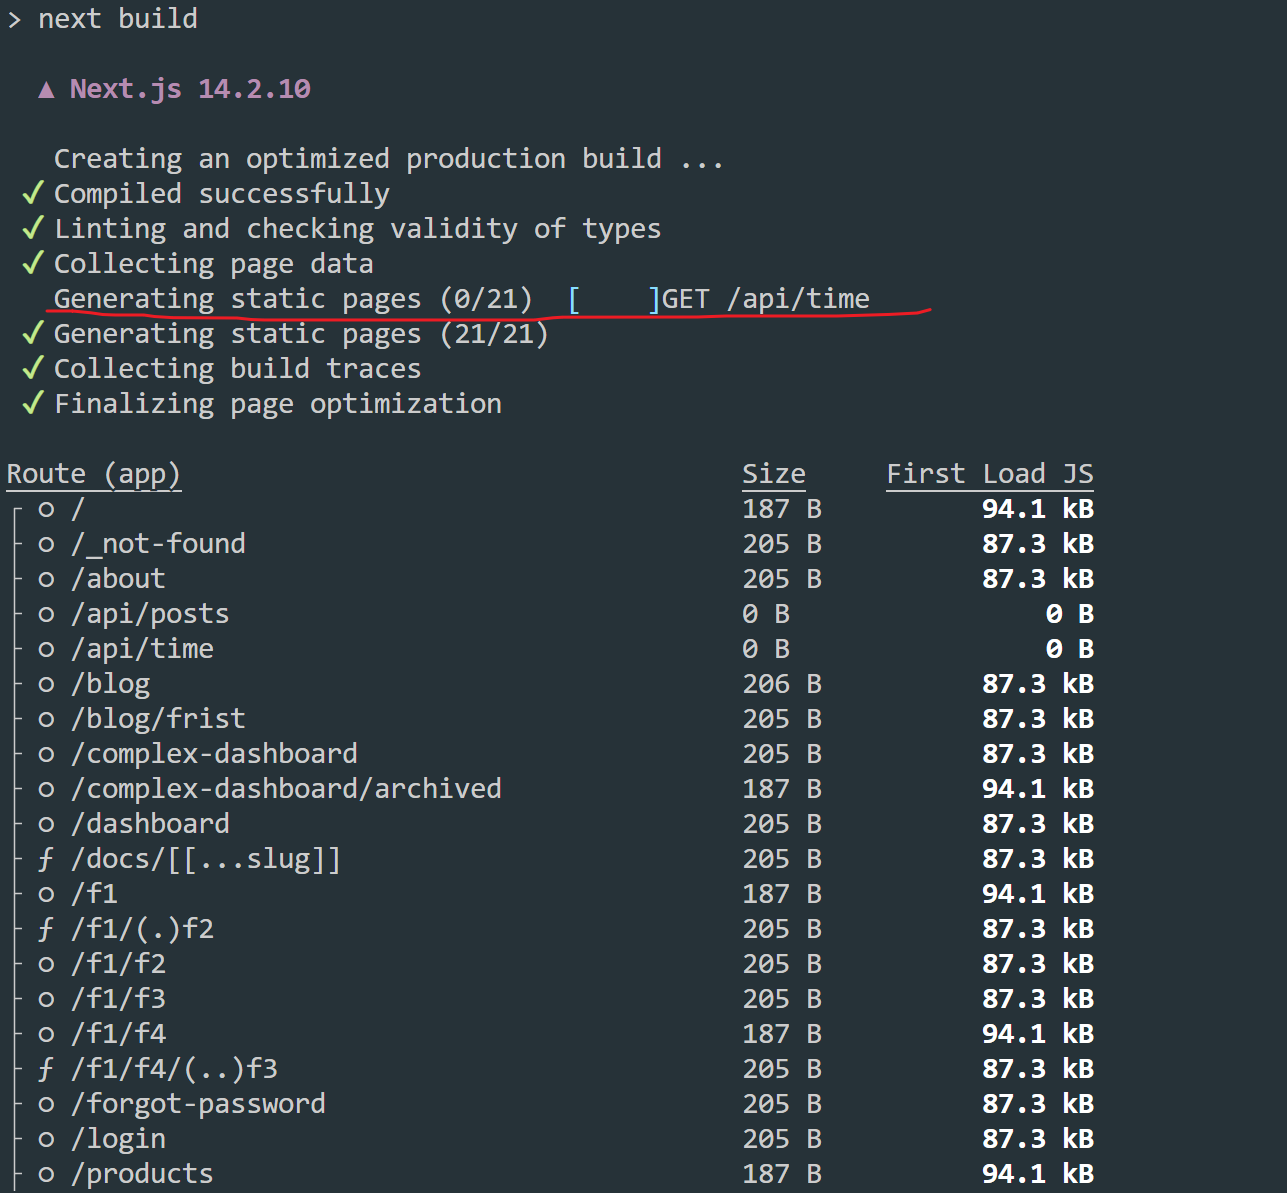
根据输出的结果,你会发现 /api/time 是静态的,也就是被预渲染为静态的内容,换言之,/api/time 的返回结果其实在构建的时候就已经确定了,而不是在第一次请求的时候才确定。
退出缓存
GET请求使用Request对象添加其他
HTTP方法tsexport async function GET() { console.log('GET /api/time') return Response.json({ data: new Date().toLocaleTimeString() }) } export async function POST() { console.log('POST /api/time') return Response.json({ data: new Date().toLocaleTimeString() }) }
此时会转为动态渲染。这是因为 POST 请求往往用于改变数据,GET 请求用于获取数据。如果写了 POST 请求,表示数据会发生变化,此时不适合缓存。
使用像
cookies、headers这样的动态函数tsexport async function GET(request) { const token = request.cookies.get('token') return Response.json({ data: new Date().toLocaleTimeString() }) }此时会转为动态渲染。这是因为 cookies、headers 这些数据只有当请求的时候才知道具体的值。
路由段配置项手动声明为动态模式
tsexport const dynamic = 'force-dynamic' export async function GET() { return Response.json({ data: new Date().toLocaleTimeString() }) }
重新验证:除了退出缓存,可以设置缓存的时效,适用于一些重要性低、时效性低的页面。
路由段配置项
tsexport const dynamic = 'force-dynamic' export async function GET() { return Response.json({ data: new Date().toLocaleTimeString() }) }假设你现在访问了
/api/time,此时时间设为 0s,10s 内持续访问,/api/time返回的都是之前缓存的结果。当 10s 过后,假设你第 12s 又访问了一次/api/time,此时虽然超过了 10s,但依然会返回之前缓存的结果,但同时会触发服务器更新缓存,当你第 13s 再次访问的时候,就是更新后的结果。next.revalidatetsexport async function GET() { const res = await fetch('https://api.thecatapi.com/v1/images/search', { next: { revalidate: 5 }, // 每 5 秒重新验证 }) const data = await res.json() console.log(data) return Response.json(data) }
2. 常见问题
2.1 获取参数
// app/api/search/route.ts
// 访问 /api/search?query=hello
export function GET(request) {
  const searchParams = request.nextUrl.searchParams
  const query = searchParams.get('query') // query
}
2.2 处理Cookie
- ts
export async function GET(request) {
  const token = request.cookies.get('token')
  request.cookies.set(`token2`, 123)
}
通过
next/headers包提供的cookies方法tsimport { cookies } from 'next/headers' export async function GET(request) { const cookieStore = cookies() const token = cookieStore.get('token') return new Response('Hello, Next.js!', { status: 200, headers: { 'Set-Cookie': `token=${token}` }, }) }
2.3 处理Headers
- ts
export async function GET(request) { const headersList = new Headers(request.headers) const referer = headersList.get('referer') } next/headers包提供的headers方法tsimport { headers } from 'next/headers' export async function GET(request) { const headersList = headers() const referer = headersList.get('referer') return new Response('Hello, Next.js!', { status: 200, headers: { referer: referer }, }) }
2.4 重定向
重定向使用 next/navigation 提供的 redirect 方法
import { redirect } from 'next/navigation'

export async function GET(request) {
  redirect('https://nextjs.org/')
}
2.5 获取请求体内容
json
tsimport { NextResponse } from 'next/server' export async function POST(request) { const res = await request.json() return NextResponse.json({ res }) }FormData
tsimport { NextResponse } from 'next/server' export async function POST(request) { const formData = await request.formData() const name = formData.get('name') const email = formData.get('email') return NextResponse.json({ name, email }) }
2.6 设置CORS
export async function GET(request) {
  return new Response('Hello, Next.js!', {
    status: 200,
    headers: {
      'Access-Control-Allow-Origin': '*',
      'Access-Control-Allow-Methods': 'GET, POST, PUT, DELETE, OPTIONS',
      'Access-Control-Allow-Headers': 'Content-Type, Authorization',
    },
  })
}
2.7 如何响应无UI内容
export async function GET() {
  return new Response(`<?xml version="1.0" encoding="UTF-8" ?>
<rss version="2.0">

<channel>
  <title>Next.js Documentation</title>
  <link>https://nextjs.org/docs</link>
  <description>The React Framework for the Web</description>
</channel>

</rss>`)
}注:sitemap.xml、robots.txt、app icons 和 open graph images 这些特殊的文件,Next.js 都已经提供了内置支持
2.8 Streaming
openai 的打字效果背后用的就是流:
import OpenAI from 'openai'
import { OpenAIStream, StreamingTextResponse } from 'ai'

const openai = new OpenAI({
  apiKey: process.env.OPENAI_API_KEY,
})

export const runtime = 'edge'

export async function POST(req) {
  const { messages } = await req.json()
  const response = await openai.chat.completions.create({
    model: 'gpt-3.5-turbo',
    stream: true,
    messages,
  })

  const stream = OpenAIStream(response)

  return new StreamingTextResponse(stream)
}
也可以直接使用底层的 Web API 实现 Streaming:
function iteratorToStream(iterator) {
  return new ReadableStream({
    async pull(controller) {
      const { value, done } = await iterator.next()

      if (done) {
        controller.close()
      } else {
        controller.enqueue(value)
      }
    },
  })
}

function sleep(time) {
  return new Promise((resolve) => {
    setTimeout(resolve, time)
  })
}

const encoder = new TextEncoder()

async function* makeIterator() {
  yield encoder.encode('<p>One</p>')
  await sleep(200)
  yield encoder.encode('<p>Two</p>')
  await sleep(200)
  yield encoder.encode('<p>Three</p>')
}

export async function GET() {
  const iterator = makeIterator()
  const stream = iteratorToStream(iterator)

  return new Response(stream)
}
中间件
使用中间件,可以拦截并控制应用的所有请求和响应。
比如可以基于传入的请求,重写、重定向、修改请求或响应头、甚至直接相应内容。比较常见的应用就是鉴权,在打开页面渲染具体内容前,先判断用户是否登录,如果未登录,则跳转到登录页面。
定义
在根目录创建一个名为middleware.ts的文件:
// middleware.ts
import { NextResponse } from 'next/server'

// 中间件可以是 async 函数,如果使用了 await
export function middleware(request) {
  return NextResponse.redirect(new URL('/', request.url))
}

// 设置匹配路径
export const config = {
    matcher: '/blog/:path*'
}
注意:这里说的项目根目录指的是和 pages 或 app 同级。但如果项目用了 src目录,则放在 src下。
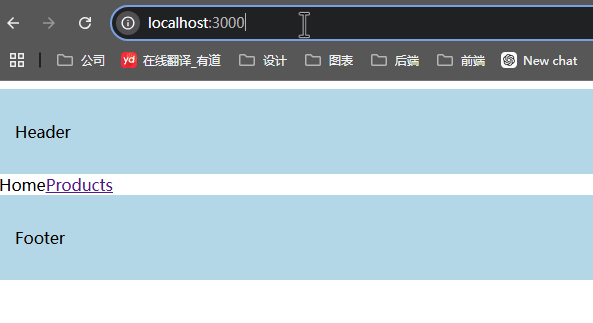
在这个例子中,我们通过 config.matcher设置中间件生效的路径,在 middleware函数中设置中间件的逻辑,作用是将 /blog、/blog/xxx、/blog/xxx/xxx 这样的的地址统一重定向到 /,效果如下:

设置匹配路径
matcher配置项
export const config = {
    matcher: '/blog/:path*'
}
matcher 不仅支持字符串形式,也支持数组形式,用于匹配多个路径:
export const config = {
    matcher: ['/blog/:path*','/products/:path*']
}
:path* 的用法来自于 path-to-regexp 这个库,它的作用就是将 /user/:name这样的路径字符串转换为正则表达式。
path-to-regexp 通过在参数名前加一个冒号来定义命名参数(Named Parameters),matcher 支持命名参数,比如 /about/:path匹配 /about/a和 /about/b,但是不匹配 /about/a/c
注:实际测试的时候,/about/:path 并不能匹配 /about/xxx,只能匹配 /about,如果要匹配 /about/xxx,需要写成 /about/:path/
命名参数的默认匹配逻辑是 [^/]+,但你也可以在命名参数后加一个括号,在其中自定义命名参数的匹配逻辑,比如 /about/icon-:foo(\\d+).png 匹配 /about/icon-1.png,但不匹配 /about/icon-a.png。
命名参数可以使用修饰符,其中 * 表示 0 个或 1 个或多个,?表示 0 个或 1 个,+表示 1 个或多个,比如
/about/:path*匹配/about、/about/xxx、/about/xxx/xxx/about/:path?匹配/about、/about/xxx/about/:path+匹配/about/xxx、/about/xxx/xxx
也可以在圆括号中使用标准的正则表达式,比如/about/(.*) 等同于 /about/:path*,比如 /(about|settings) 匹配 /about 和 /settings,不匹配其他的地址。/user-(ya|yu)匹配 /user-ya和 /user-yu。
export const config = {
  matcher: [
    /*
     * 匹配所有的路径除了以这些作为开头的:
     * - api (API routes)
     * - _next/static (static files)
     * - _next/image (image optimization files)
     * - favicon.ico (favicon file)
     */
    '/((?!api|_next/static|_next/image|favicon.ico).*)',
  ],
}
路径必须以 /开头。matcher 的值必须是常量,这样可以在构建的时候被静态分析。使用变量之类的动态值会被忽略。
matcher 的强大可远不止正则表达式,matcher 还可以判断查询参数、cookies、headers:
export const config = {
  matcher: [
    {
      source: '/api/*',
      has: [
        { type: 'header', key: 'Authorization', value: 'Bearer Token' },
        { type: 'query', key: 'userId', value: '123' },
      ],
      missing: [{ type: 'cookie', key: 'session', value: 'active' }],
    },
  ],
}
在这个例子中,不仅匹配了路由地址,还要求 header 的 Authorization 必须是 Bearer Token,查询参数的 userId 为 123,且 cookie 里的 session 值不是 active。
条件语句
import { NextResponse } from 'next/server'

export function middleware(request) {
  if (request.nextUrl.pathname.startsWith('/about')) {
    return NextResponse.rewrite(new URL('/about-2', request.url))
  }

  if (request.nextUrl.pathname.startsWith('/dashboard')) {
    return NextResponse.rewrite(new URL('/dashboard/user', request.url))
  }
}
中间件逻辑
如何读取和设置Cookies
对于传入的请求和返回的响应,NextRequest和NextResponse都提供了get、getAll、set和 delete方法处理 cookies,可以用 has检查 cookie 或者 clear删除所有的 cookies。
import { NextResponse } from 'next/server'

export function middleware(request) {
  // 假设传入的请求 header 里 "Cookie:nextjs=fast"
  let cookie = request.cookies.get('nextjs')
  console.log(cookie) // => { name: 'nextjs', value: 'fast', Path: '/' }
  const allCookies = request.cookies.getAll()
  console.log(allCookies) // => [{ name: 'nextjs', value: 'fast' }]

  request.cookies.has('nextjs') // => true
  request.cookies.delete('nextjs')
  request.cookies.has('nextjs') // => false

  // 设置 cookies
  const response = NextResponse.next()
  response.cookies.set('vercel', 'fast')
  response.cookies.set({
    name: 'vercel',
    value: 'fast',
    path: '/',
  })
  cookie = response.cookies.get('vercel')
  console.log(cookie) // => { name: 'vercel', value: 'fast', Path: '/' }

  // 响应 header 为 `Set-Cookie:vercel=fast;path=/test`
  return response
}
调用了 NextResponse.next() 这个方法,这个方法专门用在 middleware 中,毕竟我们写的是中间件,中间件进行一层处理后,返回的结果还要在下一个逻辑中继续使用,此时就需要返回 NextResponse.next()。
如何读取和设置headers
// middleware.js
import { NextResponse } from 'next/server'

export function middleware(request) {
  //  clone 请求标头
  const requestHeaders = new Headers(request.headers)
  requestHeaders.set('x-hello-from-middleware1', 'hello')

  // 你也可以在 NextResponse.rewrite 中设置请求标头
  const response = NextResponse.next({
    request: {
      // 设置新请求标头
      headers: requestHeaders,
    },
  })

  // 设置新响应标头 `x-hello-from-middleware2`
  response.headers.set('x-hello-from-middleware2', 'hello')
  return response
}
CORS
实际开发中的例子
import { NextResponse } from 'next/server'

const allowedOrigins = ['https://acme.com', 'https://my-app.org']

const corsOptions = {
  'Access-Control-Allow-Methods': 'GET, POST, PUT, DELETE, OPTIONS',
  'Access-Control-Allow-Headers': 'Content-Type, Authorization',
}

export function middleware(request) {
  // Check the origin from the request
  const origin = request.headers.get('origin') ?? ''
  const isAllowedOrigin = allowedOrigins.includes(origin)

  // Handle preflighted requests
  const isPreflight = request.method === 'OPTIONS'

  if (isPreflight) {
    const preflightHeaders = {
      ...(isAllowedOrigin && { 'Access-Control-Allow-Origin': origin }),
      ...corsOptions,
    }
    return NextResponse.json({}, { headers: preflightHeaders })
  }

  // Handle simple requests
  const response = NextResponse.next()

  if (isAllowedOrigin) {
    response.headers.set('Access-Control-Allow-Origin', origin)
  }

  Object.entries(corsOptions).forEach(([key, value]) => {
    response.headers.set(key, value)
  })

  return response
}

export const config = {
  matcher: '/api/:path*',
}
直接响应
import { NextResponse } from 'next/server'
import { isAuthenticated } from '@lib/auth'

export const config = {
  matcher: '/api/:function*',
}

export function middleware(request) {
  // 鉴权判断
  if (!isAuthenticated(request)) {
    // 返回错误信息
    return new NextResponse(
      JSON.stringify({ success: false, message: 'authentication failed' }),
      { status: 401, headers: { 'content-type': 'application/json' } }
    )
  }
}
执行顺序
在Nextjs中,有很多地方都可以设置路由的响应,比如next.config.js中可以设置,中间件中可以设置,具体的路由中也可以设置,所以要注意它们的执行顺序:
headers(next.config.js)redirects(next.config.js)- 中间件 (
rewrites,redirects等) beforeFiles(next.config.js中的rewrites)- 基于文件系统的路由 (
public/,_next/static/,pages/,app/等) afterFiles(next.config.js中的rewrites)- 动态路由 (
/blog/[slug]) fallback中的 (next.config.js中的rewrites)
注: beforeFiles 顾名思义,在基于文件系统的路由之前,afterFiles顾名思义,在基于文件系统的路由之后,fallback顾名思义,垫底执行。
中间件相关配置项
skipMiddlewareUrlNormalize和skipTrailingSlashRedirect,用来处理一些特殊的情况。
skipTrailingSlashRedirect
它指的是放在 URL 末尾的正斜杠,举个例子: www.yauyjs.com/users/地址中最后一个斜杠就是尾部斜杠。
一般来说,尾部斜杠用于区分目录还是文件,有尾部斜杠,表示目录,没有尾部斜杠,表示文件。
从 URL 的角度来看,/users/和 /users是两个地址,不过通常我们都会做重定向。比如你在 Next.js 中访问 /about/它会自动重定向到 /about,URL 也会变为 /about。
skipTrailingSlashRedirect 顾名思义,跳过尾部斜杠重定向,当你设置 skipTrailingSlashRedirect为 true 后,假设再次访问 /about/,URL 依然会是 /about/。
// next.config.js
module.exports = {
  skipTrailingSlashRedirect: true,
}
skipMiddlewareUrlNormalize
// next.config.js
module.exports = {
  skipMiddlewareUrlNormalize: true,
}// middleware.js
export default async function middleware(req) {
const { pathname } = req.nextUrl
// GET /_next/data/build-id/hello.json
console.log(pathname)
// 如果设置为 true,值为:/_next/data/build-id/hello.json
// 如果没有配置,值为: /hello
}设置 skipMiddlewareUrlNormalize 为 true 后,可以获取路由原始的地址,常用于国际化场景中。
数据获取
服务端使用fetch
Next.js 拓展了原生的 fetch Web API,可以为服务端的每个请求配置缓存(caching)和重新验证( revalidating)行为。
可以在服务端组件、路由处理程序、Server Actions 中搭配 async/await 语法使用 fetch。
// app/page.js
async function getData() {
  const res = await fetch('https://jsonplaceholder.typicode.com/todos')
  if (!res.ok) {
    // 由最近的 error.js 处理
    throw new Error('Failed to fetch data')
  }
  return res.json()
}

export default async function Page() {
  const data = await getData()
  return <main>{JSON.stringify(data)}</main>
}
默认缓存
// fetch 的 cache 选项用于控制该请求的缓存行为
// 默认就是 'force-cache'
fetch('https://...', { cache: 'force-cache' })
但这些情况默认不会自动缓存:
- 在 Server Action 中使用的时候
- 在定义了非 GET 方法的路由处理程序中使用的时候
重新验证
在 Next.js 中,清除数据缓存并重新获取最新数据的过程就叫做重新验证(Revalidation)。